
Installing a motor for heavy-duty sliding gates is one of the most important upgrades you can make for security, efficiency, and operational convenience—whether at a warehouse, commercial facility, industrial site, or large residential property. Unlike standard gates, heavy-duty sliding gates require stronger motors, reinforced components, precise alignment, and professional-grade safety systems to function properly.
This expanded guide covers every detail you need to know, including choosing the right motor, preparing the gate, installing the mounting plate, wiring the system, programming the automation, safety requirements, maintenance routines, and troubleshooting.
By the end, you’ll fully understand how to set up reliable and long-lasting sliding gate automation for even the heaviest installations.
Understanding Heavy-Duty Sliding Gates and Their Requirements
Heavy-duty sliding gates are built for demanding environments. They’re commonly used in:
-
Logistics centers
-
Factories and manufacturing plants
-
Storage yards
-
Commercial complexes
-
Apartment buildings
-
Warehouses
-
Government facilities
-
Large estates
These gates often weigh 800–2500+ kg or more, and they operate far more frequently than residential gates. This means their automation system must withstand:
-
Continuous daily operation
-
Harsh weather conditions
-
Heavy loads
-
High torque demands
-
Constant stopping and starting
-
Frequent interaction with vehicles or machinery
This is why Sliding Gate Automation for industrial gates must be more robust than standard residential systems.

Choosing the Right Motor for Heavy-Duty Sliding Gates
Selecting an appropriate motor is the foundation of a reliable automation system. A weak or mismatched motor will fail prematurely, overheat, or cause unsafe operation.
Below are the key considerations in detail:
Motor Capacity Based on Gate Weight
Gate weight is the most critical factor. Most motors fall into these classes:
-
800–1200 kg motors — Suitable for commercial gates
-
1200–1800 kg motors — Ideal for industrial applications
-
1800–2500+ kg motors — Required for logistics facilities and steel gates
Always choose a motor that exceeds your gate’s weight by 20–30% to avoid strain.
Duty Cycle and Operating Frequency
Heavy-duty gates often open dozens or even hundreds of times per day — especially in:
-
Warehouse loading docks
-
Delivery centers
-
Apartment parking garages
-
Industrial zones
-
Gated communities
A motor with a high duty cycle or continuous-duty rating is essential. Look for features such as:
-
Heat dissipation design
-
Cooling fins
-
Thermal protection
-
Strong internal gearing
A motor not designed for heavy-duty use will overheat and shut down.
Motor Type: AC vs. DC
AC Motors
-
Preferred for extremely heavy gates
-
High torque output
-
Better for industrial environments
-
Very durable
DC Motors
-
Better energy efficiency
-
Quieter operation
-
Compatible with battery backup
-
Ideal for medium commercial gates
The choice depends on your gate’s weight and usage frequency.
Drive Mechanism
Most heavy-duty sliding gates use a rack and pinion system. The pinion gear on the motor engages with a gear rack attached to the gate.
For heavy-duty applications:
-
Steel gear racks are recommended
-
Nylon racks are quieter but less durable under heavy loads
A steel rack ensures long-term reliability.
Want expert installation for commercial or industrial gates? Browse our advanced automated gate systems here.
Smart Features and Safety Compatibility
A modern sliding gate motor for heavy-duty installations should include:
-
Soft start & soft stop
-
Obstacle detection
-
Auto-close timers
-
Adjustable speed control
-
Manual release lock
-
Compatibility with safety beams and loops
-
Overcurrent protection
These features prevent damage and improve user safety.

Tools and Materials Needed for Installation
Before starting the installation, prepare these materials:
-
Heavy-duty sliding gate motor
-
Base plate and mounting bolts
-
Steel gear rack sections
-
Photocell safety beams
-
Conduits and wiring
-
Concrete anchors
-
Limit stops or magnetic switches
-
Drill and drill bits
-
Screwdrivers and wrenches
-
Angle grinder
-
Level
-
Welding tools (recommended for steel racks)
Preparation ensures smoother installation and prevents delays on-site.
Step-by-Step Guide: How to Set Up a Motor for Heavy-Duty Sliding Gates
Below is a detailed, professional-level breakdown of the installation process.
Step 1: Inspect and Prepare the Gate System
Before installing the motor, make sure the gate structure itself is in optimal condition. A motor cannot compensate for a misaligned or faulty gate.
Check for:
-
Smooth sliding movement
-
Proper alignment with no sagging
-
Clean and debris-free track
-
Stable top rollers
-
Even ground levels
If the gate drags, binds, or vibrates, fix the mechanical issues before adding automation. This step is essential to avoid motor damage.
Step 2: Build or Prepare the Motor Foundation
A heavy-duty sliding gate motor must sit on a solid, level, reinforced concrete base.
The process includes:
-
Marking the exact motor position next to the gate
-
Ensuring the pinion gear aligns with the gate rack line
-
Setting anchor bolts into the concrete
-
Allowing concrete to cure if pouring a new pad
-
Ensuring the surface is perfectly level
An unstable base leads to misalignment and operational failures.
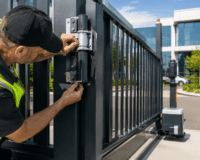
Step 3: Install the Motor on the Base Plate
Place the motor on the mounting plate and secure it lightly:
-
Do not fully tighten bolts yet; adjustments are required later
-
Ensure the pinion gear is directly in line with where the rack will sit
-
Maintain a slight gap (usually 1–2 mm) between the pinion and rack to prevent friction
The precise alignment ensures smooth, quiet operation.
Step 4: Attach the Gear Rack to the Gate
This is one of the most important steps in sliding gate automation.
To install the rack:
-
Move the gate manually and position the first rack segment on the pinion gear
-
Tack weld or bolt the rack into place
-
Move the gate along the full track length
-
Continue attaching rack segments, ensuring they meet level and flush
-
Check alignment continuously
-
For steel racks, weld solidly after confirming alignment
The rack must follow the gate’s path perfectly — even slight height changes will cause noise or stress on the motor.
Step 5: Install Limit Stops or Magnetic Limit Switches
Limit switches tell the motor where the gate should stop. Most modern systems use magnetic switches for precision.
Install:
-
One stop at the fully closed position
-
One at the fully open position
These markers help prevent overtravel and motor strain.
Step 6: Electrical Wiring and Power Connections
This step must be done carefully for safety and reliability.
Considerations include:
-
Using outdoor-rated cables
-
Running wires inside conduits
-
Installing proper grounding
-
Keeping all connections waterproof
-
Adding surge protection to prevent lightning damage
-
Connecting according to manufacturer wiring diagrams
For commercial sites, a licensed electrician may be required.
Step 7: Install and Align Safety Devices
Safety is mandatory—especially for heavy-duty sliding gates.
Install:
-
Photocell safety beams on both sides of the gate
-
A flashing warning light
-
Emergency manual release access
-
Safety edge sensors if required
-
Loop detectors for vehicles (optional but common in commercial sites)
A heavy-duty gate can cause serious injury without functioning safety systems.
Step 8: Program the Gate Motor
Every motor requires custom programming depending on the site and gate size.
Programming typically includes:
-
Setting fully open and closed limits
-
Adjusting acceleration and deceleration
-
Configuring soft start and soft stop
-
Pairing remote controls and keypads
-
Setting auto-close time
-
Adjusting force sensitivity
-
Testing safety beam responses
-
Setting pedestrian mode (optional)
Proper configuration ensures safe and smooth operation.
Step 9: Perform Comprehensive Testing
Before handing off the system, test the gate thoroughly:
-
Listen for grinding noises
-
Check if the gate moves smoothly at all points
-
Confirm the motor does not vibrate excessively
-
Test obstacle detection
-
Make sure the gate stops and reverses correctly
-
Check manual release functionality
-
Test under different weather conditions if possible
A heavy-duty gate must operate perfectly — even small issues can become major problems over time.
Common Mistakes to Avoid When Installing Heavy-Duty Sliding Gate Motors
Many installation failures come from simple mistakes. Avoid the following:
-
Installing the motor on uneven concrete
-
Choosing a motor with insufficient capacity
-
Misaligning the rack height
-
Forgetting to install safety beams
-
Allowing wires to run unprotected outdoors
-
Overtightening the motor bolts before alignment
-
Using nylon racks for heavy-weight gates
-
Ignoring the gate’s mechanical condition
-
Skipping regular servicing
Attention to detail is essential for long-term reliability.
Long-Term Maintenance Tips for Heavy-Duty Sliding Gate Automation
A well-serviced motor can last 10–15 years or more. Maintenance needs include:
Regular Gate Cleaning
Remove dirt, leaves, stones, and debris from the track.
Lubrication
Oil steel gear racks and rollers regularly.
Safety Beam Checks
Ensure photocells remain aligned and clean.
Motor Housing Inspection
Check for insect nests, water ingress, or wiring wear.
Bolt Tightening
Vibration from heavy gates can loosen bolts.
Professional Annual Service
Commercial gates should have a certified technician inspect them yearly.
Troubleshooting Common Issues
Here are common symptoms heavy-duty systems experience:
Gate moves slowly
Likely power supply issues or gate friction.
Gate stops midway
Obstruction or misaligned safety beams.
Remote has limited range
Battery issue or interference.
Motor overheats
Duty cycle too low for your gate → upgrade required.
Loud grinding noise
Indicates poor rack alignment.
Addressing problems early prevents expensive repairs.
Should You Install the Motor Yourself or Hire a Professional?
For light residential gates, DIY installation can sometimes be acceptable. But for heavy-duty sliding gates, professional installation is strongly recommended.
Hire a professional if:
-
The gate weighs more than 500 kg
-
You need to weld steel racks
-
The site requires safety compliance
-
The gate is in a commercial or industrial facility
-
You need integration with access control systems
-
You want long-term warranties
A poorly installed heavy-duty gate is a serious safety hazard.
Final Thoughts: Reliable Automation Begins With Quality Installation
Setting up a motor for heavy-duty sliding gates requires planning, precision, and high-quality components. When installed correctly, sliding gate automation provides:
-
Increased security
-
Smoother daily operations
-
Hands-free convenience
-
Better traffic flow
-
Reduced manpower
-
Longer gate lifespan
Whether you’re securing a warehouse, industrial yard, residential estate, or logistics hub, proper installation ensures your system works flawlessly for many years.
Looking for long-lasting gate automation? Buy a premium sliding gate motor designed for industrial performance — shop now.